Enabling Okta single sign-on (SSO)
You can link your Gliffy account to Okta to enable single sign-on (SSO). Before you can do so, the following must be in place:
- You must contact Gliffy support (support@gliffy.com) to obtain all necessary information
- The person performing this process is an administrator in both Okta and the Gliffy Enterprise account
-
The email address used in Okta and in Gliffy Enterprise are identical
1. In Okta, navigate to Okta Admin. Choose Applications > Add Application > Create new app.
2. Choose SAML 2.0 > Create.
3. Set the App Name to Gliffy, and if you want , upload the logo provided by Gliffy support and then click Next.
4. Set the parameters as shown below, using the URL and URI provided by Gliffy support:
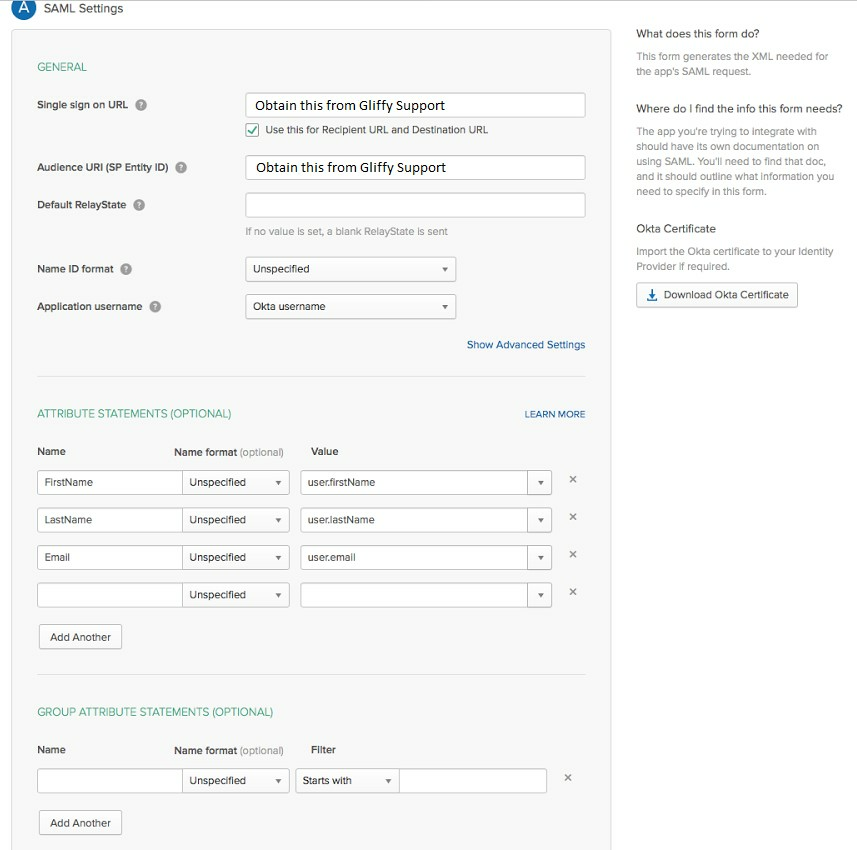
Attribute Statements should be:
| Name | Name format | Value |
|---|---|---|
| FirstName | Unspecified | user.firstName |
| LastName | Unspecified | user.lastName |
| Unspecified | user.email |
5. Click Next and select I’m an Okta customer adding an internal app.
6. Select This is an internal app that we have created and then click Finish
7. In Okta, click the People tab and click Assign to People.
8. Find your Okta user profile and click Assign to make yourself a Gliffy user.
9. Optionally, assign yourself a username and then click Save and Go Back > Done.
10. Click the Sign-On tab and next to the yellow bar, click View Setup Instructions
11. Keep this tab open, and navigate to Gliffy Online in a new browser tab. Ensure you are logged into Gliffy as an administrator of your Enterprise account.
12. From the top-right corner, click the profile icon ![]() > Account Settings.
> Account Settings.
13. Click Single Sign On.
14. Open your Okta tab, and copy the sign in URL from the Setup Instructions page. Paste this into the noted field within Gliffy.
15. Open your Okta tab, and copy the X.509 certificate from the Setup Instructions page. Paste this into the noted field within Gliffy.
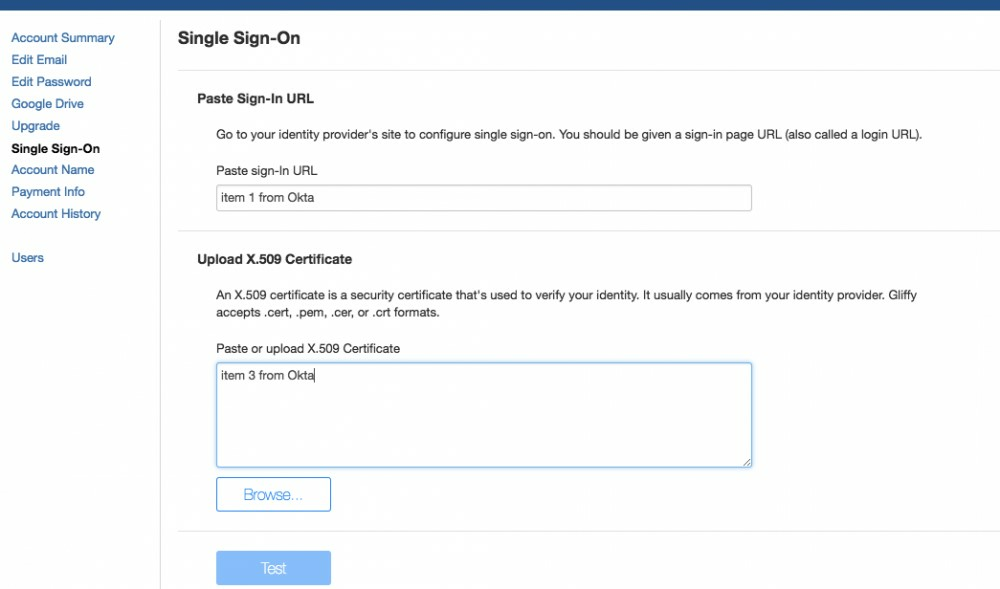
16. At the bottom of the Gliffy window, click Test. The login process is tested and a confirmation appears to confirm proper configuration.
17. When ready, click Enable to enable SSO functionality within your Gliffyaccount.
18. Navigate back to Okta and assign the app to the appropriate users via the steps found here: https://support.okta.com/help/Documentation/Knowledge_Article/27418177-Using-the-Okta-Applications-Page#Assigning